Last Updated on February 19, 2022 by Allison Price
It is interesting to consider that I have spent most of my life at the galloping – the important parts of my life. Most of my first memories of horses involve speed. My life has been filled with horses, and I’ve done so many things with them. But the only time I feel comfortable riding on horseback is when I get up off my four-legged friend’s back and he starts a gallop. Then we go out into the country with an “let’s just see what happens next” attitude. Galloping with half a tonne of graceful, graceful, and living creatures gives me a thrill I wouldn’t be able get from a pet horse.
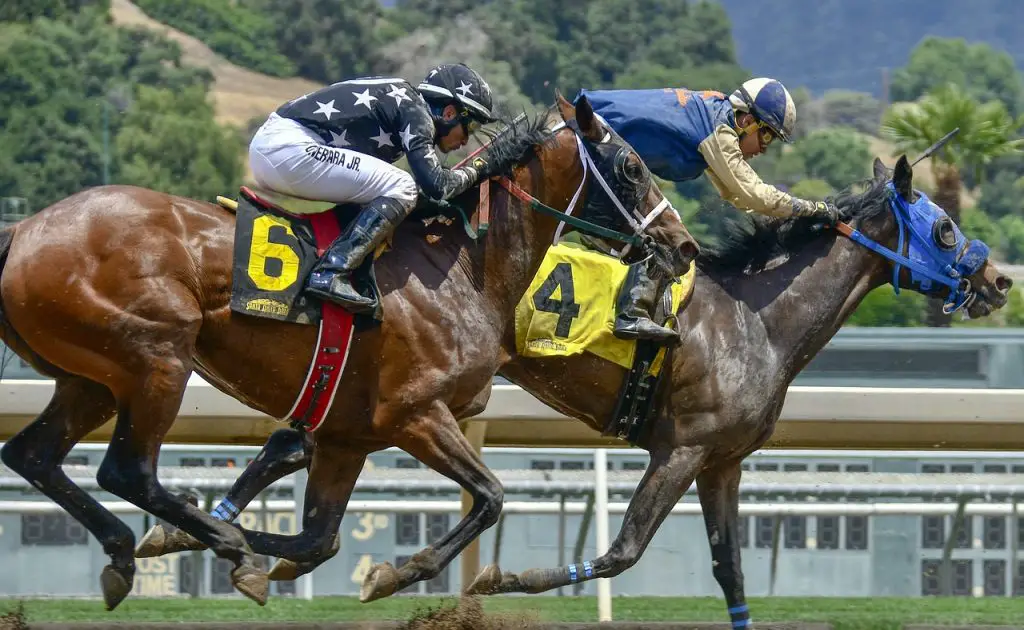
Horsemen debated about the mechanics behind a horse’s galloping until 1878. Some believed the horse must always have at least one foot on ground, while others claimed there were times when all four feet are off the ground. According to an apocryphal legend, the photos below were taken by Leland Stanford (a business tycoon) to settle a wager. He hired Eadweard Muybridge as a photographer to capture the horse’s gallop. Sallie Gardiner was ridden by Domm, a jockey (his other names are lost forever), at 36 miles an hour. Muybridge’s photos clearly show that Sallie is in a suspension during her gallop. These photos were taken on the Stanford University horse-breeding facility in Palo Alto, California.
Galloping mechanics
I value my horse’s ability to walk, trot, and canter. According to my father’s U.S. Cavalry Conditioning axiom, a rider should walk for muscle, trot or gallop for wind. However, the mechanics and velocity of the canter and the galloping are distinct.
The canter is mechanically three beats long, followed by a period for suspension. If a horse is cantering on its left lead, it means that his left front foot, also known as the “leading”, will touch the ground first. For the left-lead canter, the sequence of footfalls is as follows: right hindfoot, left hindfoot, right forefoot and left hindfoot touching ground simultaneously with a diagonal pair. Finally, the left forefoot touches the ground. This is followed by a period in suspension. This suspended phase of the canter’s canter is scientifically called the “unsupported transformation”.
The sequence for the gallop, however, is four beats with a suspension period. Horsemen refer to a horse galloping on a lead. This is the same concept as the canter. The lead is determined by the foot that touches the ground first. That means that the left foreleg will be further forward than the right. A horse will walk on his left lead with right hind, left hind, right forefoot and left forefoot footfalls. Then, he will stop to let the four feet rest.
Most horsemen believed that the galloping horse had at least one foot on ground before 1878. Eadweard Mughbridge, a photographer, used an early version stop-action photography to show that the gallop has a period when there is no support for flight. The London Royal Veterinary College continued this scientific research more than 100 years later with a series studies that determined the best galloping position for each rider. contains the results of these studies.
Science has given us a better understanding of our horse’s movements at the gallop as well as the galloping position. This allows us to keep in close harmony with him.
Your horse’s pace and conformation will determine whether he can go from a trot to a gallop at 600m/minute or 20 miles per hour. According to the Internet sites I looked at while writing this column, 44 mph is the maximum speed an equine can reach for short distances. You will be able to trust what I write if you’ve been reading them for a while. However, it is possible to rest easy knowing that you only travel at half the speed of horses. It is a small comfort, but it is there.
Galloping Safety
Okay, you now know what a gallop looks like. What’s the next step? We need to discuss your position in order to make you feel safe and secure before you can actually gallop. We’ll also talk about how you got started in galloping. If you’ve never tried the gallop before, you need to not borrow a friend’s 4-year old Thoroughbred off-the-track Thoroughbred Thoroughbred and “take it for an easy gallop”. This could be dangerous for you. You will probably never ride again outside an arena if you are lucky enough to survive being badly ran over with.
We need to slow down if this is your first time riding in an arena, or if you’ve only ridden on trails at the walk, then we should take the “learning how to gallop” process slowly. You should start galloping on a horse that can be thrown into a gallop, but slows down when you stop kicking. You don’t need another horse to galloper with you, even if they are calm horses. You might end up in a horse race with your horse, but that is not the purpose of the exercise.
Before I introduce you to the galloping, I will make sure that you can safely trot and canter around large fields. My stables are located on a hayfield that covers 35 acres. I find this to be adequate. It is possible that you are a novice rider who has never been outside an arena. You will need to mentally adjust before you can continue the lesson.
Learn how to judge your speed
You will need enough space to allow for the larger turns that you will be making as your speed increases over time. Because stepping in a hole or galloping on poor footing is the fastest way to make a horse sound, I will assume that your field is level and free from hazards like rocks and groundhog holes.
You can measure a 400-meter speed trap in your galloping area. Markers should be placed at the end and beginning of this measured distance. As you approach the marker, make sure they are visible. Because most competitions I prepare riders to compete in use metric measurements, I prefer meters over yards or feet. Because it’s a quick show-jumping speed, 400 meters is the starting distance for my speed trap. Most riders will be able to canter at this speed.
It’s pretty straightforward, right? You might be surprised to learn that although 400 mpm isn’t much more than you are used to, your stirrup length should be approximately 1 inch. Your two-point position should be where your seat is high above the saddle, but not too close. You don’t need to rest your knuckles against the neck of your horse to balance. Adjust your stirrups leathers and use vertical stirrups leathers. Now, you can test your balance at the halt. Get out of the saddle and start to trot. Then, pause at the top. Cross your arms in front of yourself and maintain your balance for longer and longer periods without using your arms to stabilize you. This is easier for you than it is for us to say. I will spend many lessons training you mentally and physically to ride at speed. Shorter stirrups will also help you improve your fitness. The shorter stirrups will make your thighs and small of your back fatigued more quickly than normal.
After you have adjusted the stirrups to the shorter length, start cantering through your speed trap. Keep track of the time for each exercise. 400 mpm should take about one minute. This section may require him to canter rather than to accelerate.
Learning to gallop faster will take time. After you have mastered the 400-meter speed trap, measure another speed trap at a different spot in the field. You will attempt to complete the distance in one minute. (See the progression I use in order to improve your speed. For every 100 mmph, I ask you to reduce the length of your stirrup leathers. This will allow you to ride faster and make it up to 600 mpm. You need to keep your hip angle open to follow your horse’s movement. The faster you go, the longer you must ride.
Your horse may begin to anticipate speed traps. You will need to teach him to wait before he returns to the slower speed trap. You must stay ahead of your horse mentally and physically.
The Pulley Rein
You should keep in mind that your horse will become more fit during this time and it may show up in other activities. Horses that used to canter around the Baby Novice cross country courses with a loose rein might re-engage in the sport. While this can be fun, you should change your training methods as your horse’s needs change. You should know how to use a pulley to control your horse’s speed.
Your usual aids for slowing down your horse may not be working. To help your horse listen, you can shorten your reins by putting your left hand across the horse’s neck, in front of his shoulders, and pressing your left hand toward his right shoulder. Your right hand should be pointed back towards your right hip. Soft reins are a great way to show your appreciation for your horse’s slowing down.
I hope that you soon experience the joy of galloping. Everything about horses is a pleasure for me. I love to train them in dressage, teach them how to stay calm and balanced during show-jumping rounds, and introduce them to water. My horse and I can only feel complete freedom when we are both gone, galloping towards an invisible horizon. He floats through the air and I feel free.