Last Updated on February 19, 2022 by Allison Price
No matter what type of riding you do – the more you communicate with your horse using your leg, seat, and hand aids, the better your horse will perform.
Your horse will perform better if you communicate correctly with him using your aids.
No matter what type of riding you do – the more you communicate with your horse using your leg, seat, and hand aids, the better your horse will perform. Unconsciously, many riders send their horses contradictory and confusing signals. This article will address some common problems that I see in the hunter, jumper, and equitation rings. It also includes some suggestions for how to fix them. These exercises are divided into three groups: hands, legs, and seat. But remember that all your aids can be interrelated. You can make each one work best when you combine them.
Ask a ground person for feedback and help when you are doing these exercises. You can also do these exercises with another rider. Each rider will be responsible for observing the other and giving instructions. You will need a stable, patient horse for some of these exercises. If your horse isn’t sure if they are able to do these exercises, you can try them in a smaller area such as a roundpen or on the longeline with an experienced horseperson.
Horses are creatures of habit. Your horse will need to be taught how to properly respond to a new aid if you make changes to the way you apply it. Don’t expect immediate results. Keep repeating the correct aids until the child begins to associate the response with them.
Similar to the above, your body will require a lot of repetitions to build muscle memory and strength to be able to execute these new skills correctly. Incorporate the exercises that you are trying to improve into your daily riding. Each one should be done for a set amount of time.
Before we start, let me give you a tip: Include more walking and canter in your training sessions. The majority of riders spend their time trotting. You can improve your skills by focusing on the walk and canter, as I will explain.
Make Your Hands Better
People learn to ride naturally have a tendency to use their hands to control everything. It is more efficient to use less hands when riding. You can save your hands by learning how to use your legs to communicate basic cues such as “slowdown” and “slow down”, and you’ll be able to move your horse onto the bit and bend your knees. These are some common hand mistakes and how to correct them.
Problem: Too-stiff hands/arms. Your shoulders, elbows, wrists, and wrists should be flexible and elastic so you can follow your horse’s mouth with ease. If your hands aren’t flexible enough to follow a horse’s neck and head (moves it forward or back), they will pull on the horse’s mouth when he raises his head up and create loops in his reins when he lowers his head.
Fix 1 – At the walk, place your hands about 1.5 feet apart. Pay attention to your horse’s neck and head, which will happen twice per walk stride. Keeping a light, steady contact–not heavy pressure–concentrate on opening and closing your elbows to allow your hands to follow his mouth. You can think of the reins like rubber bands. Try not to let them slip in his mouth. To stop him slowing down or stopping, keep your legs crossed in front of you.
You should not be stiff in your arms and hands. Keep your hands approximately 1 1/2 feet apart. Your hands should follow his movements with ease so that your reins don’t loop and your hands don’t accidentally bump into his mouth.
Juan Blas
You should walk around the rings making circles and turning your horses’ necks. Next, do the same at the trot or canter. Horses don’t gesture their heads when they trot but they do so in the canter once for every stride. You should be able to follow the gesture with your hands and keep your elbows and shoulders relaxed. Ask your ground person if you need to keep an eye on the reins while you ride. They will let you know if they snap or sag.
Remind yourself to keep your arms straight when you return to riding, with your hands in the right position (4-5 inches apart).
Problem : Clutchy hands or too strong. Riders can pull too hard on horses’ mouths due to nerves (for instance, fear of being ran away with), lack balance (using the reins instead of the legs for balance) or an untrained leg (more later). Horses will respond by leaning onto the bit. A 1,200-pound horse will win every pull match.
Fix 2 To learn how to ride with more understanding hands, hold your reins in your fists and pull them backwards. This is the same way that people drive horses. Instead of threading your reins between your third- and fourth fingers, and then up from the tops your fists with your hands, try threading them between your thumbs, forefingers and down through your fists. This way you have less strength to hold the reins, which makes it easier for your horse to pull. You can ride in each of these gaits. Tie a knot just below your point of holding the reins if you are worried about them falling.
Practice riding with the driving reins to prevent over-strong or clutch fingers.
Juan Blas
Problem: Busy/bouncy hands. Excessive hand movements can distract, confuse, and even hurt horses.
Fix 3 – Practice riding by holding a bat horizontally, with one end pressing against each hand. This will ensure that your hands are steady and parallel with your horse’s neck.
You can keep busy or bouncy hands steady by holding a bat horizontally between your legs while you ride.
Juan Blas
Problem: “Broken” wrist. Bending your wrists in any direction will affect your ability to give smooth, direct rein assistance and follow the horse’s movements fluidly.
Solution 4: Place a tongue-depressor on the inside of your wrist parallel to your forearm with the end against your palm. You can attach it with tape or a bandage. You can also buy a wrist bandage/splint from the pharmacy, or a rollerblading guard. You can ride with it until your wrist is straightened.
A tongue depressor can be taped to the inside of your wrist to repair a broken wrist.
Juan Blas
Problem: Too-long reins. This can make it difficult to maintain a consistent contact and communication with your horse.
Fix 5 Wrap a piece of tape around each rein in 2 places. Mark the end where your hands should be.
Tape around your hands to remind you to not let your reins grow too long or too short.
Juan Blas
Problem: Too-wide hands. Your forearm and rein should form a straight line when viewed from the top. This line should run from your elbow through your wrist down to the mouth of your horse. You’ll reduce the effectiveness of direct rein aids if your hands are held further than 4 to 5 inches apart.
Fix 6 You can practice riding by holding a bit with rings, but no shanks. For example, a dee ring, or eggbutt slip. Use your fingers to wrap the rings around your finger, or your middle finger and pointer. It is possible to hold both the bit and the reins simultaneously, but it is possible.
Amber Henter holds a dee-ring bit with one ring in each of her hands to keep her hands from slipping apart.
Juan Blas
Improve Your Legs
Stability and education are key to riding success. You can improve the timing and placement of your leg aids, and teach your horse how to respond faster to them. This will allow you to achieve better performances and more precise results.
Problem Leg in front or behind your body. Your leg should be directly under your body. Your upper body will drop forward if it swings backward. You will eventually fall off your horse if you do this enough. You may accidentally give your horse conflicting signals by applying a leg aid behind the girth.
Your upper body will sink if your legs swing in the opposite direction. Also, your legs will swing forward and fall off your horse’s sides. This can make it worry about whether they might suddenly return. Horses will be happier if they have constant contact with their legs and don’t anticipate unexpected aids. Your upper body may be behind your horse’s motion and you might unconsciously tell them to slow down. It’s crucial to convey to your horse that you want to go forward, even if they are nervous or hot. If your back is tilted, it could have the opposite effect. This creates a driving chair, which we’ll discuss later.
Your upper body must not tip forward or backwards in order to influence horses effectively. These three tips will stabilize your legs and improve your upper-body control.
First, check the length. The stirrups should reach your ankle when your feet are free from the stirrups, and your legs extended to the sides of your horse. The ideal length of the stirrups will vary from one person to another. Your stirrups might be too long if your leg slips in front of your. They may be too short if your leg slips in front of you. Remember that the length of your stirrups will change as you get older, so make sure to check it often.
Leg-position problems can be corrected by adjusting the length of your stirrup. You can check your leg length by lowering your leg down on the side of your horse. Your ankle should be in contact with the stirrup bar.
Juan Blas
Fix 8. Try the following exercises to assess your body control. You can also strengthen your leg position by changing your posting sequence to change diagonals each stride. Begin by sitting down for two beats, then rising for one. Repeat this process over and over. This will help your body to not get ahead of your horse’s movements. Next, practice sitting in the saddle for two steps and standing for one. This will help your body avoid falling behind the action.
Posting exercises can help correct a swinging or tipping upper-body. Samantha Kraus is changing her diagonal every step by sitting in the saddle for just two beats, and staying there for one.
Juan Blas
Fix 9 – Next, you can try this counting exercise. It is great for strengthening your back, balance, and getting your legs under you. With your legs straightened, your seat in a two-point position and your weight evenly distributed over your lower legs. You can grab some mane to balance you, and then slowly, rhythmically count to four. As you slowly stand up in the saddle press the balls of your feet against stirrups, align your hip angles, ankle, knee, and knee joints. Slowly count to four as you lower your weight into your heels, and then bring your body back to two-point.
You can improve balance and strengthen your legs by counting to four. As you move from a two point position to standing in your stirrups (as Katherine Schmidt does here), your hip and knee angles will be straightened. Then, count back to two and then return to the original position.
Juan Blas
You can now count to four by lowering your chest to the neck of your horse. Keep your arms straight and your legs under your hips while extending your arms outward along his crest towards his ears. You can balance on your own without having to lean on your horse’s neck. Follow his mouth with your hands and you will have loops in the reins. Instead of thinking about bending at the hip, think about bending at the spine. Continue counting to four while you bring your body back to a two-point position. As you move from one position to another, make sure not to accidentally yank your horse’s mouth.
Continue counting to four, closing your hip angles and bringing your chest towards your horse’s neck. Katherine’s hands follow Cody’s neck, but she’s not leaning on Cody’s neck to support her. This indicates that her balance is entirely dependent on her legs. Continue counting to four as you return back to the two-point spot.
Juan Blas
This can be repeated several times. If you feel comfortable, then try it at the trot, walk and canter. You can also play with the speed of your count, slowing down or going faster. Advanced riders can complete the exercise at the canter by counting in time with the horses’ strides.
Problem Horses are not responsive to leg-aids. This could be due to a horse’s inability to respect the rider or nagging leg-aids. A mark on the horse’s side from when you rub his hair with your spur is the most obvious sign of a problem.
Fix 10 You can ride without spurs, but with a whip. Before you attempt this exercise, make sure your horse is familiar with the whip. Gently squeeze your legs or kick your legs several times when you ask your horse to move forward. If he does not respond, you can smack him with a whip at his leg and simultaneously cluck with your tongue. He must associate the cluck and the whip. Otherwise, the cluck will not mean anything to him.
To resensitize your horse if you are constantly nag him with your legs, the whip can be used. You can help your horse learn to associate the cluck and kick with “Go!” by following your leg aid.
Juan Blas
If your horse responds to your request, you can return to the milder treatment the next time. This will allow him to demonstrate that he has learned the lesson and also give you the chance to whip or cluck him if he doesn’t move quickly. This may take several repetitions over a few days or weeks until your horse responds to normal leg aids. It may take some practice to make sure that every time you give a leg aid or cluck, you are sending the message that “when I say go, it means go!”
Enhance Your Seat
It is not difficult to ride with an effective saddle–using your body weight and positioning in the saddle for communication with your horse–but it can be confusing. To encourage your horse forward, it can be as simple as lowering your seat or shifting some weight out of the saddle. You can also shift your weight backwards by opening your hip angle and signaling your horse to slow down. You’ll be able to coordinate your hands and your seat with your legs to help your horse balance on turns, grab his stride, and learn advanced skills like lateral work.
Problem: Too much rein and too little seat can slow down your horse and cause downward transitions. You need to improve your seat if you are unable to transition from trot-to-walk without heavily relying on your reins.
Fix 11. Start in a trot and slowly slow down your posting. Each stride, take a second to sit in the saddle. Keep your legs in contact the sides of your horse while you continue to walk. If he continues to walk for a while, increase the rein pressure until he walks. A verbal cue can be added, such as “walk” and “whoa,” until he responds to your seat.
Practice trot-walk transitions to improve your sitting position. Try to use as much rein as you can. You can start by starting in a regular posting trot.
Next, stand taller and slow down your post. Then, think about walking. As you can see, Alexa Anthony keeps Tucker’s legs in touch with hers. He responds by slowing down and walking with very little rein pressure.
Juan Blas
Too many driving seats. Driving seat: This is where you sit in the saddle with your back against the motion. It’s useful for situations like when you are approaching jumps or if your horse is scared. You will be punished if you use a hunting seat in the hunter rings because it shows a lack trust in your horse.
Fix 12 To get your horse ready for the leg and cluck exercises (Fixes 7-10),
Problem:Too many riding in two-point. While practicing in two-point can help strengthen your legs, balance and develop your seat, it will not help you.
Fix 13 Learn to ride on the flat without stirrups You’ll spend less time in the saddle shifting your weight and balancing on them, as they won’t be there to press against and balance you.
Over Fences
All the exercises above will increase the effectiveness of your aids on the flat as well as over fences. These are two jump exercises I find particularly helpful.
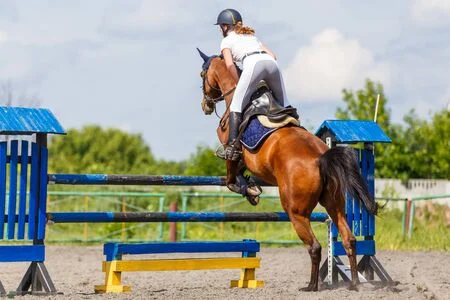
Problem: Your horse may be trying to tell your that you are using too much hand to land. This could be to signal him to slow down, turn, or anxiously wait for the next lead change.
Fix 14: Turn on landing. For trust reasons, you can forget about courses and just practice jumping one fence at a time. Focus on the landing side of every jump and don’t pull the reins. After a few strides, slowly turn in a circle. He will be slowed down by the turn.
You can repeat this process several times, changing the direction each time. Continue to add single jumps around your ring. Turn after each jump and canter until your horse is calm. Then, move on to the next one. You can keep your sessions simple until your horse is able to land on his own and stabilize himself. You can then gradually add other demands to your practice sessions, such as lead changes or lines. This will ensure that you don’t overwhelm him.
Fix 15 Practice trot bounces. Practice bouncing will help you balance your body and keep your horse in line. It’s also possible to do it without reins. This will help you to less rely on your hands. As you go through the exercise, you will need to have a ground person help you adjust the distances or build the jumps. You can’t trust your horse to jump the line without reins. Instead, you can replace the verticals with cavalletti at the highest height. Set the bounce distances and ask your ground person for assistance. You can also set up a chute that has extra standards and rails along the bounce line to create barriers high enough for run-outs.
Lines of trot bounces can be a fun and effective way to improve balance and position. Amber is practicing the “airplane” on Cecil, one of our favourite tricks.
Juan Blas
Set up three to six low verticals in the middle of the arena. Each one should be about 10 feet from the jump before the next. Six can be done. You can do as many jumps as you like. A ground pole should be placed 8 feet from the jump. You can also build a series up to four trot poles, cavalletti or trot poles, each 4 feet apart. The last one should be 8 feet from the jump. You should also place a groundpole on the landing side for the last jump. This will allow your ground person to assess its position and adjust the distance if necessary.
The trot approach to the jump. You may need to practice the jump if you’re not as experienced. This will prevent you from being left behind when you takeoff. You could accidentally signal your horse to accelerate if you wait until you’re only a few strides ahead of the jump before you go into two-point. Grab your mane as you cross the last cavalletti.
Alternate the direction that you turn each time you pass the line. Once you have jumped through the first bounce, or two, have your ground person construct the next bounce. Then, place a new groundrail on the landing side of the bounce, between the next set standards. Keep going until you have completed the entire fence line.
If you are confident that your horse will jump through the line unassisted (most horses do), you can tie your reins a little further from the buckle to ensure they don’t dangle near your horse’s legs when you let go. Next, hold the end of your knot as you approach the line of bounces. Once you have reached the end of the cavalletti, release the reins. Now extend your arms to the sides and let go. If you have a tendency to slump your shoulders, this is a great way to get your hands on your head the next time. If you find it difficult to reach your hands in front of him, you can either raise them toward his ears or bring them forward. If you are prone to getting ahead of the motion, you can also fold them behind your back.
These two exercises are for more advanced riders: If your tendency is to jump ahead, first circle one arm in the air and then circle the opposite arm. Then, continue rotating as you jump along the entire line. You can also do this exercise if you find yourself falling behind the motion by circling your arms in front.
This is a great way to practice riding with another rider. As you go through the line, take turns calling out commands. Every other jump, add a new command: “Hands on my head!” Airplane!” Have fun with it!
Boo Major, a hunt-seat trainer, has been the University of South Carolina’s head coach for 16 years. She coached 22 horses to the Intercollegiate Horse Show Association National Championships in her seven-year tenure. Tara Brothers was also a national champion. Boo has coached students to over 50 NCEA wins and 17 individual and team national championship wins since 2005 when the National Collegiate EquestrianAssociation format was adopted. Kristen Terebesi is the first rider ever to win two individual NCEA titles in one season. The University of South Carolina won last season’s inaugural Southeastern Conference Championship.
Boo is a former chair and member of several National Collegiate Athletic Association Varsity Equestrian Committees. She has always been a strong advocate for equestrian becoming a NCAA championship sport. Boo helped establish the rules and regulations of the NCAA emerging sport equestrian. Boo is a U.S. Equestrian Federation technical delegates and ‘r” eventing judge whose experience includes dressage, eventing and foxhunting. She is also the owner of a small farm in Blythewood (South Carolina) and the mother to Robert McDow Duncan III, 13 years old.